I will be comparing Sephora by OPI Gold Blasted to Sally Hansen Antiqued Gold. I do have some surprising results too!
But first, I wanted to show you how La-Paz-Itively Hot Matte looks with top coat!

CLOSE UP!

Some background info first...
I originally bought 3 bottles of the Sally Hansen Crackle when it first came out. Two bottles of gold and one of the blue. I was so excited to try it! Especially the gold! I needed a gold crackle in my life! Unfortunately, I got lousy results. Here is an old cell phone picture of what happened....
(Don't mind the mess, I didn't bother cleaning up because I was so mad; I took a quick photo before removing it all!)

Blech!
I was very disappointed, so I returned them to Walgreens and got a refund. However, I did keep one of the golds, because someone suggested adding thinner to it and trying it again. I added a few drops of thinner, but let it sit unused until now.
While on my Epic Philly and Delaware Polish Adventure with Krissi and Cas, we stopped in at a Sephora, and I tried the Sephora by OPI Blasted Gold. ZOMG! I fell in love! I thought it had a much prettier shade of gold compared to the Sally Hansen, AND IT CRACKED! Unfortunately, they were sold out so I couldn't buy any. Since then I have been dying to get a bottle! My wonderful friend Heather surprised me and ordered me one from Sephora a few days ago! It was so nice of her! I couldn't wait to try it out! So, I figured why not give the Sally Hansen another whirl and while I am at it, compare the two for you!
I hope my photos make sense LOL. As you know, I had OPI La-Paz-Itively Hot Matte on. I only applied top coat to the matte on my pointer and middle nails. I left my ring and pinky nails go, and wanted to see if I got different results applying the two crackles over top coat versus plain matte.
As you can see here, there was little crackle action on the nails that I did not apply top coat to. I would recommend always using top coat in between your base polish color and the crackle.

These nails have top coat under the crackle. Amazingly enough, the thinner did the trick to my Sally Hansen! Just look at the nice crackle pattern I got! $OPI has nice results too, but they look completely different.

Here are the nails without top coat in between the matte and the crackle. This is a sad sight lol. As you can see, they both suck without the top coat!

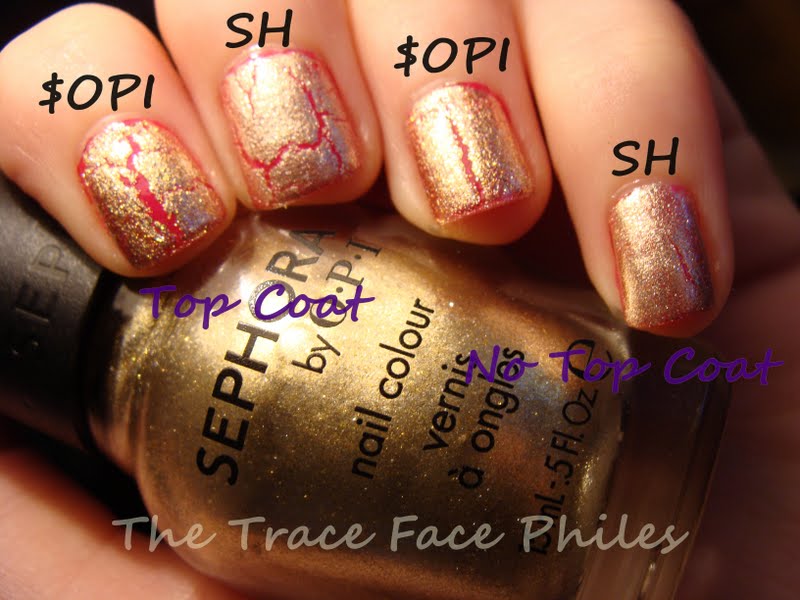

Now I applied top coat over the crackle!


Kinda blurry, but isn't it beautiful??

To recap, I suggest if you are having trouble with your SH Crackle, add a few drops of thinner and try it again. I also recommend using top coat and allowing it to dry before applying OPI, $OPI, China Glaze, Sally Hansen Shatters/Crackles. Personally, I don't think you NEED BOTH of the $OPI Blasted Gold and the Sally Hansen Crackle. I prefer the look of the $OPI, it is more shiny/sparkly IMO.
What are your thoughts? Have you had any difficulty with the Sally Hansen Crackle? Have you tried the Sephora Blasted?


